We all love moist cake. I always imagine that fudge cake is moist and chocolaty. I never had chance to eat the store-bought one though. However, moist cake might involve too much butter sometimes.
Few weeks ago I found this recipe that use cocoa instead of chocolate, and oil instead of butter. Sounds better, I thought. So I made it, with a little bit my own way, which is skipping out the baking soda and baking powder, cut off sugar a bit, replace half of oil with yogurt. Unfortunately, by skipped out the food additives, I need something to rise the cake, which is egg. Yea, I know, not totally fat free. At least egg is a natural ingredient :p I also took the long way by whipping up eggs and sugar first until fluffy, rather than just stir and stir.
The original recipe has a very interesting icing that made of coconut cream instead of regular cream. I really, really wanted to make the icing, really. It didn't happen. Two reasons, my boys wouldn't be patient enough to wait for icing, and I was happy enough to have it without icing. Maybe someday, someday, I will ice a cake. Someday. Yup.
This cake satisfied me, my hubby and our two boys. It is moist, that you can eat it straight away after you put in the fridge. Yes, it didn't get dry after I put it in the fridge over night. I will definitely make it again, and again.
So here it is, if you like to try, our humble, moist Chocolate Fudge Cake.
Chocolate Fudge Cake
Ingredients:
1 cup of plain flour
¼ cup of cocoa
3/4 cup of sugar
3 eggs
½ teaspoon of salt
1/4 cup of oil (I used sunflower oil)
1/2 cup of yogurt
1/4 cup chocolate chip (optional)
1/4 cup coarsely chopped roasted cashew (optional)
Directions:
- Preheat your oven to 180C.
- Line a 20x20cm cake tin with baking paper.
- Sift flour and cocoa in a bowl and stir to combine.
- Stir together in other bowl salt, oil and yogurt until blend.
- Whisk eggs and sugar with electric mixer until fluffy.
- Fold in the flour mixture and the yogurt mixture alternately with spatula until well combined.
- Put in the oven and bake for about 20-30 minutes. The time will vary depending on your oven.
- Cook until bamboo skewer comes out clean.
- Once cooked, remove from the oven and allow to cool.
- Get a fork! :)
Showing posts with label cake. Show all posts
Tuesday, June 25, 2013
Thursday, March 1, 2012
Mud Cake

Hi!
I used to wonder what would be the different between what they called as Mud Cake with other chocolate cakes. So, to find out, I made this once about a couple months ago. I made it out of a recipe from Exclusively Food which I found through Google (my number one source of recipes), with several changes.
Fortunately, the cake could feed not just anyone in our house back in Tangerang, but I could also had chance to gave a half of the cake to my brother. His wife returned to me to say that she and her sister like the cake. They said it's delicious. Alhamdulillah. I promised her to give the recipe, but we were too busy preparing to move to NZ. It took quite long time, I had forgot what kind of changes I made in the recipe.
Yesterday, I try to make this Mud Cake again from the same source, and again, made some changes to suit my liking.
When I make some adjustment to a recipe I found, I usually change the using of sugar and/or the food additives. Well, sometimes I make changes simply because I didn't have the needed ingredients on hand. Of course, that made me NOT always successfully made it, ha ha!
This is dede, who was fallen asleep on the carpet,
but woke up again after I bribed him
with the pan that I used to melt chocolate-->
Oh, one more important thing to be concern when you make cake but prefer NOT to use any food additives as baking powder or baking soda is the method. Food additives give short cut in making cake. With help of food additives, some long methods sometimes are not important to do any more. Take muffin as example. You don't need to use electric mixer or too much of eggs to raise a cake. But if you intend to make food additives-free cakes, you have to go through the complete or right procedures.
The complete procedure for sponge cake type is to whisk the eggs and sugar until as fluffy as you can get. Then fold in dry ingredients(flour and friends) and wet ingredients(milk and friends) alternately in three batches. Yep, you have to do little bit more work.
The result of most of additive-free cakes may not be high-risen ones like any other cakes with additives. But if the taste just as lovely and delicious, why bother using any of it, right?
Anyway, let's back to muddy Mud Cake. I don't know why they name it Mud Cake. The texture is not slimey-gooey like mud. My Mud Cake is more like ground or wet sand. Is it wrong? I don't know. But I would not really care about it when I eat it, because it taste good. The cake texture is really-really dense. I think this could be an option for chocolate lover who's looking for the alternative of brownies.

cracky..

..crackilicious.
One more thing before you read through the recipe, I made what I think as a lighter ganache. Well, if using milk instead of cream can be called 'lighter', then it is lighter *grin*. I only use 150 gram of chocolate, because it was all I have left on hand *another grin*. The cake itself IS full of fat of course. It has butter, oil, chocolate and sugar in it. But I replace buttermilk with yoghurt and reduce the sugar. I hope it helps a liiiiiitle bit to lighter it. If you afraid the ganache will be too runny, you may start with 1/3 cup of milk, and add more if needed.
Soooo, if your heart is broken, your boss is being a jerk, the traffic makes you vomit, or any of bad day, just go home and make one of this. Forget how much fat in it 'coz you deserve it!
Mud Cake
Ingredients:
250g dark chocolate
200g butter (if using unsalted butter, add 1/4 teaspoon salt with the butter)
3/4 cup water
2 cups plus 2 tablespoons plain flour
1/4 cup plus 2 teaspoons cocoa powder
1 1/2 cups sugar
4 large eggs
2 tablespoons oil
1/2 cup yoghurt
Ganache, just melt everything above simmering water and stir to blend!
150g dark chocolate
1/2 cup milk
1 tablespoon salted butter
Directions::
- Preheat oven to 160 degrees Celsius.
- Line 20cm diameter round cake pan with non-stick baking paper. I use a springform pan for easy removal of the cake.
- Place 250g chocolate, butter, oil and water in a large saucepan over low heat, stirring occasionally until they melted. Add salt and water, stir until they blend. Remove mixture from heat and allow to cool to lukewarm/room temperature. Add yoghurt in and stir well.
- Sift the flour and cocoa powder together into a large bowl.
- Whisk eggs and sugar with electric mixer until fluffy and white.
- Fold flour mixture and chocolate mixure to the egg alternately in three batches with spatula until well combined.
- Pour mixture into prepared pan.
- Bake for about 40 minutes to 1 hour.
- Insert a thin-bladed knife or wooden skewer into the centre of the cake to test whether it is cooked through. If the knife/skewer comes out clean or with moist crumbs (not gooey batter) attached, the cake is ready.

- When the cake has cooled to room temperature, remove it from the pan.
- The top surface of the cake will probably have a crunchy crust, which you may wish to trim off. But I didn't.
- We turn the cake upside down to give a flat surface for icing.
- Then I just cut the cake into two. I use the bottom as the top to get flat surface on top.
- Spread the ganache on first piece of cake. Top it off with the other piece of cake. Don't stop. Just spread all over the surface with ganache until all covered up.
- Let it cool. You may put it in the fridge for faster result.
- After the ganache hardened, you can cut it with knife and enjoy.

Wednesday, September 28, 2011
Ananas Cupcake

I had leftover homemade pineapple jam after last Idul Fitri. Homemade? Did I make it myself? No. Someone made it at her home and I just bought it, hehe! I made Nastaart (pineapple jam filled cookies) with it for the Eid day.
So yesterday, buttercake is the one thing I thought I could make it easy and quick. I remember the jam in the fridge, with previous recipe, voila: cupcake-shaped-nastaart!
The blend of butter and pineapple jam is sweeeet! The butter and yogurt made the cake easily melt in the mouth.
The filling is easy, because the homemade jam is very thick like paste so I can mold into small balls with my hand, then mix them in the batter with spatula.
So quick, so yummy.
Ananas Cupcake
Ingredients:
1 1/4 cup flour
150 gr butter
2/3 cup sugar
2 eggs
125 gr yogurt
1 tbsp homemade thick pineapple jam
More thick homemade pineapple jam, about probably 50-100 grams. it's really up to you ;)
Direcions:
- Preheat oven on 180C
- Line cupcake tins with liners.
- Beat margarine and sugar with electric mixer til the color turn to pale.
- Mix in eggs, one by one until quite fluffy-er.
- Mix in 1 tablespoon of pineapple jam, mix just to spread.
- Mix flour and yogurt in with spatula, alternating each.
Now, there are 2 ways:
1. Good way: pour in with spoon the batter in the liner, then fill in with jam, then cover it with batter.
2. My way: pinch the jam into small balls, and throw them into the batter. mix with spatula to spread them. Than, pour in the batter into the liner, make sure each liner has at least one ball ;)
- Bake for about 20-30 minutes or until it passed the poking test.
- Get it out of the oven. Eat!

Thursday, July 7, 2011
Lemony Marble Cake
Yellow,
It was quite a while that I hadn't seen my electric mixer. After the old one is broke, my dear hubby bought me a new one. But as my Mom was sick and then passed away, the house held some several events like 40 harian (40th day), a prayer for my Mom -even though I was not really agree about holding it, but anyway-. After that, I'm still have to take care of the house. It's darn messy. I just realize that we've been really lived in the junks. The house is too full with too many junks and unnecessary things. I was, and still, overwhelmed, and over-tired too.
Oh if you notice, I'm posting in English. I have to, for practice. Why? Later, maybe in a few months I will tell you guys. So, please forgive me for my lousy English :)
Back to the topic.
Due to those events I mentioned above, people came and helped us. Some stuffs in the house had to be moved somewhere. Apparently my electric mixer was moved too. I lost it for few days. But, I finally found it in one of the bedroom. Phew!
I'm glad my baby's back ^^
I have to admit, that I probably accept too much tasks after my Mom got sick. I still have a lot of tasks now. I know I probably should delegate some tasks to some other people. But to whom??
Maybe this fatigue has switch off my brain, I almost can't think of what should I do with the stuffs that still untouched in the house. They're just darn too freaking-many!
Anyway, I remember the time when I got depression after having new babies few years back. Baking, or making any delicacies, could loosen up my nerves. So, I thought making something with my mixer might help. I begun to think of what to make. I thought making easy cake will be great. Maybe just buttercake with 2 eggs. I remember I've once made a buttercake into cupcake. So I thought to make one again based on that recipe, only marbled.
I thought to add something tangy. I thought of orange. But the fridge said that I don't have any. But I have lemon! Nice.
While Pak Sadam, a distance neighbor, helped us moving up some stuffs while I was just pointing my finger to which stuffs should be moved, I started to make a cake. A marble buttercake, I thought.
I took out my digital scale, and turn it on. But nooo! It's not on! I'm not sure whether it need new battery or just broke. But I wasn't give up. I knew I have to switch the scaling into measuring with cups. I also got the margarine in sachet that weight 200 gram. So I imagined that the sachet was divided into 4 part, and I just took three part of it. (Sesat ya? ;p) So the measurement will be as you'll see bellow.
I used the 20x20cm tin. The cake came out quite flat, but not sodden. If you want to try this recipe, I suggest you to take a loaf tin. I used yogurt instead of milk to make it moister. The top has nice crumble. The chocolate part taste chocolaty dark, and the white part has a subtle lemony taste. Oh and I used margarine, only because my butter has expired. I still think butter is a better option.
Oh I typed too much. Here's the recipe. Enjoy :)

Lemony Marble Cake
Ingredients:
1 1/4 cup flour
150 gr butter/margarine
2/3 cup sugar
2 eggs
zest of 1 lemon
1 tbsp of lemon juice
125 gr yogurt
1 heap tsp cocoa powder
4 tsp hot/warm water
Directions:
- Preheat oven on 180C
- Mix cocoa with hot water until become paste. Set aside.
- Mix yogurt with zest and juice. Set aside.
- Beat margarine and sugar with electric mixer til the color turn to pale.
- Mix in eggs, one by one until quite fluffy-er.
- Mix flour and yogurt in with spatula, alternating each.
- Take about one third or half of the batter and mix it with the cocoa paste. Then you'll get white and chocolate batter.
- Line a tin with paper. I use 20x20cm tin (and it became thin cake, only about 1-1.5cm tall cake. Maybe you better use loaf tin ;))
- Pour in both of the batter with spatula or spoon into the tin. Make swirls with chopstick or sharp knife to make marble effect.
- Bake for about 20-30 minutes or until it passed the poking test.
- Get it out of the oven. Cut and eat. ;p
Makes about 16 slices

Wednesday, January 5, 2011
Cake Pisang Tepung Beras

Sore...
Lagi seneng banget nih, habis bikin cake-nya mbak Nur El yang pernah ikutan Banana Week. Sampai-sampai belum ijin sama yang punya resep. Resep aslinya di sini ya.
Untuk Mbak Nur El, salam kenal dan sekalian ijin contek resep dan ngelink dari blog-ku ya Mbak. Maap nyontek dulu baru minta ijin, huhu.. *push up dulu deh*
Kuenya spongyyyy banget. Menggemaskan, pengen aku remes-remes (psycho-mode on!). Aku senang banget bisa kue yang gluten-free, additive-free kaya gini. Rasanya insyaAllah lebih alami dan lebih sehat.

Ada sedikit perbedaan dari resepnya mbak Nur. Aku memilih memakai minyak sayur ketimbang mentega maupun margarin, karena masih ingat Pak Wied Harry bilang kalau nggak salah untuk kue lebih baik pakai minyak saja. Lalu aku pakai tepung tapioka sebagai pengganti tepung sagu. Jumlah pisangnya juga kulebihin sedikiiit sekali sekitar 10 gram lagi.
Aku memutuskan untuk memanggang dengan loyang loaf. Eh, ternyata masih bersisa banyak. Jadilah aku mengerahkan loyang-loyang muffin bersama liner-nya. Alhasil aku dapat 6 cupcake dan 1 loaf cake. Hooray!
Oiya, Mbak Nur El memanggang cakenya lama banget ya 1 1/4 jam(??). Aku memanggang baru sekitar 25-30 menit aja bagian atasnya sudah coklat gelap nyaris hitam. Kusimpulkan sih karena ovennya aja ya. Well, beda rumput, beda belalang. Beda rumah, beda ovennya ya, hehe!
Pokoknya seneng banget deh, terima kasih berat buat Mbak Nur El *peluk erat!*.

Cake Pisang Tepung Beras
Bahan:
160 gr pisang ambon
90 ml minyak sayur
100 gr tepung beras
20 gr tepung tapioka
4 btr telur ayam
100 gr gula palem
1/4 sdt garam
Cara membuat:
- Ayak bersama tepung beras, tepung sagu dan garam. Sisihkan.
- Haluskan pisang (aku menggunakan blender). Sisihkan.
- Panaskan oven pada suhu 190 derajat celsius.
- Lapis loyang dengan olesan tipis margarin, kertas roti, lalu olesan tipis margarin lagi. Bisa juga menggunakan loyang muffin dan mangkuk kertas tanpa oles-oles lagi. Sisihkan.
- Kocok telur dan gula palem dng kecepatan tinggi hingga adonan mengembang dan kental.
- Turunkan kecepatan menjadi kecepatan paling rendah. Masukkan pisang. Aduk hingga merata. Masukkan campuran tepung bergantian dengan minyak. Sambil diaduk hingga merata. Matikan mikser.
- Tuang adonan kedalam loyang. Panggang dng suhu 190 derajat celcius selama 25-30 menit, atau tergantung oven masing-masing.
- Keluarkan loyang dari oven.
- Tunggu hingga agak dingin agar cake sudah bisa dilepas dari loyang. Setelah dipotong-potong. Siap untuk disajikan.

Tuesday, December 28, 2010
Just Cupcake

Hari ini Abi ulang tahun, yay! Alhamdulillah umur beliau udah 63 tahun.
However, sebetulnya hari ini aku bikin kue bukan karena untuk merayakannya. Tapi karena sudah berhari-hari menyimpan sisa ganache minggu lalu. Ceritanya, aku minggu lalu mau bikin kue bolu kukus, tapi sayang si bolu nggak mekar dan juga nggak lembut alias mingkem dan bantet.
Jadi untuk mensiasati si bolu mingkem, maka aku melakukan apa yang para baker akan lakukan saat kuenya gagal: membuat rhum ball. Rhum ball kubuat dengan resep menggunakan ganache jadi-jadian. Nah, ganache ini ternyata bersisa cukup banyak, jadi kusimpan di kulkas.
Bolu kukus mungkin belum kukuasai karena masih keukeuh bikin bolu kukus tanpa emulsifier dan cs-nya. Tapi mungkin juga sih, karena aku masih salah mengocoknya (ngaku).
Anyway, pagi-pagi tadi sudah bikin cupcake mini. Resepnya dari buku resep Femina.
Alhamdulillah, dengan resep ini aku bisa membuktikan bahwa ternyata kue jenis buttercake pun bisa dibuat tanpa bahan-bahan aditif. Yippiiiiiiiiieee!!
Karena sudah lama nggak bikin kue jenis buttercake, agak-agak lupa tips-tipsnya dan sempat pesimis melihat hasil kocokan mentegaku. Tapi ternyata, all works just fine. Nggak bantet sama sekali. Pheeew! Terobati semua luka bolu kukus bantetku. Halahh, lebay!
Berhubung aku lagi pelit karena kemarin vanilla bean-ku terpaksa sia-sia karena dicampur ke bahan kue bolu yang kemudian bantet, maka kali ini aku nggak pake vanila. Namun, aku juga nggak mau kueku jadi bau amis telur, maka aku pakaikan sedikit kayumanis. Not bad. Tapi sayang, ternyata aku yang kayanya lagi bosan dengan aroma kayumanis, padahal biasanya suka banget. Hiks.
Ganache yang tersisa aku panaskan sedikit lalu kupakai sebagai pencelup cupcake.
It's simple cupcake.
ButterCupcake
diadaptasi dari buku Seri Masak Femina, Primarasa Indonesia, Sajian Pesta, Mungil itu Lezat dengan resep asli bernama Cake Mungil
Bahan:
150gr mentega/margarin -> aku pakai campur(ternyata butter-ku habis)
125gr gula
2 butir telur
125ml susu
1/2 sdm air jeruk nipis
180gr terigu dan 20gr tepung mazeina -> resep aslinya pakai 200gr terigu saja
1/2 sdt kayumanis bubuk -> resep asli pakai esens vanili
Olesan:
ganache secukupnya
Cara membuat:
- Panaskan oven pada suhu 180 derajat celcius.
- Alasi loyang muffin dengan mangkuk kertas, atau olesi dengan margarin saja.
- Kocok mentega dan gula hingga putih dan lembut. Tambahkan telur satu per satu. Kocok hingga putih mengembang.
- Campur susu dengan air jeruk. Ayak semua tepung bersama kayumanis bubuk.
- Masukkan sepertiga bagian tepung sambil aduk balik dengan spatula.
- Masukkan setengah bagian susu sambil aduk balik dengan spatula.
- Lakukan terus sampai bahan habis. Aduk balik hingga rata.
- Tuang adonan ke dalam mangkuk kertas atau langsung di loyang hingga hampir penuh.
- Panggang sekitar 20 menit atau hingga lulus tes tusuk.
- Angkat. Biarkan dingin.
- Celup permukaan cupcake ke dalam ganache. Biarkan hingga ganache membeku. Hidangkan.

Thursday, July 29, 2010
Cake Singkong

Aha! Akhirnya, GLUTEN FREE!
Setelah memendam sekian lama ingin membuat cake yang gluten free, akhirnya tercapai juga cita-citaku!
Kenapa harus gluten free? Nggak harus, tapi bagi sebagian orang; HARUS. Seorang teman yang memiliki anak Autis mau nggak mau harus mencari makanan yang gluten free, karena seorang pengidap Autis nggak boleh makan makanan yang mengandung gluten. Terigu merupakan bahan makanan yang mengandung gluten. Apakah dengan mengganti terigu sudah berarti aman bagi anak autis? Sayangnya belum. Mereka juga harus berhati-hati terhadap gula, dan sebagian dari mereka juga mengidap alergi terhadap bahan makanan lain seperti telur.
Bagaimana dengan anak yang nggak mengidap autis? Menurut Pak Wied Harry, pakar gizi yang suka ada di tv itu lho, gluten yang nggak tercerna tubuh bisa menggangu daya imun anak. Jadi sebaiknya jangan terlalu sering mengkonsumsi makanan berbahan utama yang mengandung gluten. Begitulah kalau aku nggak salah. Kalau salah tolong diperbaiki, ya.
Anyway, dari dulu sebetulnya aku suka sama kue singkong yang dijual tetangga di dekat rumah Mamahku. Kuenya aku nggak tahu namanya, bentuknya seperti cake kecil, berbentuk bundar seperti pie, dengan warna kuning muda dan katanya dari singkong. Hmm.. Biasanya mamah memesan kue itu kalau sedang ada hajatan. Kalau nggak ada acara? Ya, nggak mesan. Makanya sekali memesan pasti jumlahnya nggak sedikit. Jadi nggak mungkin juga aku memesan kue itu cuma 2-3 potong.
Mamah sebetulnya punya buku resep tanpa gambar yang ada resep cake singkongnya, tapi namanya lain, entah apa, aku lupa. Kue itu sepertinya mirip dengan kue yang kumaksud. Lho, katanya tanpa gambar, kok tahu itu kue yang dimaksud? Soalnya di sampul buku resep tersebut ada foto kecil kue-kue yang mirip dengan si kue singkong tersebut. Tapi aku nggak pernah berani membuatnya.
Kadang Allah suka memaksa juga ya, ha ha ha! Sepertinya Dia tahu apa mauku, tapi Dia tahu juga aku suka malas, maka rasanya koran Kompas hari Minggu lalu agak 'memaksaku' untuk benar-benar mencoba membuatnya. Resep kue tersebut 'muncul lagi' di halaman koran tersebut dengan nama Cake Lapis Singkong. Cake ini berlapis dengan tiga warna. Diwarnai dengan pewarna sintetis tentunya.
Aku kan sudah berkomit untuk meniadakan pewarna sintetis sebisa mungkin dalam makanan-makanan yang aku buat. Maka, terbitlah ide pewarna alami: SUJI.
Sayangnya, aku nggak teliti membaca resep. Dalam daftar bahan yang dibutuhkan nggak tertera adanya kelapa parut. Baru saja aku mau membuatnya, baru aku sadar kalau di dalam keterangan cara membuatnya tertulis "campurkan kelapa parut..". Ha?? Aduh... kenapa nggak lengkap gini sih, daftar bahannya?? Alhasil, acara membuat kue diundur sehari demi membeli si kelapa parut. Maklum, waktu yang tersedia untuk membuat kue sangat pendek: cuma sebatas waktu tidur siang anak-anak. Begitu mereka bangun, maka berakhirlah acara masak-memasaknya :D
Akhirnya hari berikutnya jadi juga aku membuat kue ini. Takaran kelapa parutnya hanya kukira-kira sendiri saja. Takaran lain pun aku buat jadi ukuran cup. Hasilnya wangi daun pandan tercium semerbak dan warna hijaunya cerah. Bagian atasnya pun kutaburi almond panggang. Tadinya sih, maunya ditaburi dengan kenari panggang (kenari pada kue mengingatkanku pada resep-resep kue jaman dulu) tapi berhubung kenarinya belum sempat dipanggang, ya seadanya aja deh. Sayangnya kue ini bagian bawahnya agak basah. Sebetulnya bukan salah si resep. Aku duga karena aku nggak cukup kering memeras singkongnya. Lha wong aku cuma memeras pakai tangan terus ditiriskan di peniris aja kok. Pemalas memang. Next time, gunakan serbet deh untuk memeras singkongnya sampai tiris-ris-ris!
Jadi, saudara-saudara, ada dua pelajaran yang perlu dicermati dalam kesalahan yang kubuat kali ini. So learn from my mistake and DON'T DO IT! What you have to do is:
1. READ THOUROUGHLY A RECIPE BEFORE YOU DECIDE TO MAKE IT. Terutama pada resep yang sumbernya nggak mengkhususkan diri pada bidang masak-memasak.
2. SQUEEEEZE HARD TIL DRY. Singkongnya jangan cuma ditiriskan ya... :p
Nah, setelah menguingat-ingat kesalahanku -hiks- mari kita lihat resepnya. Selamat mencoba!

Cake Singkong
Bahan:
1/2 kg singkong, parut halus
4 btr telur
1/2 cup kelapa parut
100 gr margarin, lelehkan
3/4 cup gula pasir
1/2 sdt garam
2 lbr daun pandan
4 lbr daun suji
1/4 cup air
2-3 genggam almond atau kenari panggang, remukkan kasar
Cara membuat:
- Blender halus daun pandan, daun suji dan air
- Saring daun yang sudah diblender dan campurkan airnya ke dalam parutan singkong, lalu aduk rata.
- Peras parutan singkong hingga tiris
- Campurkan kelapa dan garam ke dalam singkong dan aduk rata
- Siapkan dandang/kukusan di atas kompor dengan api besar
- Oles dasar loyang 20x20x5cm dengan sedikit margarin, lalu lapisi dg kertas roti atau plastik tahan panas.
- Kocok dengan kecepatan tinggi telur dan gula hingga mengembang tinggi, putih dan kental. Matikan mixer.
- Masukkan campuran singkong ke dalam telur perlahan, aduk balik dengan spatula hingga rata.
- Masukkan margarin cair sedikit-sedikit sambil diadukbalik hingga rata.
- Tuang ke loyang, ratakan. Taburkan dengan almond/kenari panggang.
- Kukus kue 30 menit, lalu tes tusuk. Bila kurang matang bisa ditambah waktu pengukusannya.
- Angkat dan biarkan dingin. Potong-potong.

*bisa jadi 24 potong mini cake*
Monday, February 8, 2010
Creamcheese Cake

Nope, not Cheesecake - cheesecake. It's more cheese sponge cake made out from creamcheese.
Ya, resepnya aslinya berjudul Brownies Kukus Keju, yang suka disingkat jadi Brokus Keju. 'Penggubah'nya Pak Sahak. I have no idea who he is. A chef maybe? Tapi kayanya cukup terkenal di kalangan kursus membuat kue.
Nah, karena judul aslinya saja sudah 'kukus' maka seharusnya dikukus. Tapi, dikarenakan pas mau mengambil kukusan yang ada di atas lemari, oh ternyata kotor dan lengket, jadi males nyuci. Aku putuskan saja untuk memanggangnya dengan oven. Pemalas, pemalas, pemalas...
Meski sudah punya timbangan digital, eh belum cerita ya? Nanti saja ya? Anyway, meski sudah punya timbangan digital, masih juga malas menimbang. Alhasil ukurannya aku konversi ke ukuran cup.
Sebetulnya aku membuat kue ini karena ada sisa creamcheese saja sih. Ohya, aku nggak tahu hasilnya seperti apa kalau dikukus. Mungkin seperti juga kue kukus lain, kue ini akan lebih lembut permukaannya serta padat. Mungkin lho. Tapi dipanggangpun kue ini cukup lembut. Teksturnya seperti spongecake tapi tidak seret di kerongkongan. Rasanya juga sangat keju. Emm!
Ohya, as you see, aku tendang itu TBM dari resepnya. Ha ha ha!(ketawa jahat). Bisa juga kannn. Kue ini kan memang dimaksudkan menjadi brownies, jadi saat dimasukkan ke loyang 20x20 ia terlihat agak pendek. Tapi nggak bantet seperti brownie umumnya. Membuatnya alhamdulillah gampang. Mamah langsung suka sama kue ini, tapi beliau merasa kuenya agak sedikit kemanisan. Baiklah, karena keju krim sudah sangat magteg, mungkin sebaiknya kita kurangi lagi gulanya lain kali supaya nggak blenger.
Ok, ini resep asli yang beredar di milis, I just copy-pasted it.
Brownies Kukus Keju
Source : Sahak Pribadi
Bahan A :
Telur 3 butir
Gula 100 gram
TBM 1 sdm
Bahan B :
Tepung terigu 60 gram
Maizena 20 gram
Garam 1 sdt
Susu bubuk 40 gram
Bahan C :
250 cream cheese
50 – 100 gr mentega
Cara Membuat :
1. Kocok bahan A sampai mengembang.
2. Masukan bahan B lalu aduk sampai rata.
3. Kocok bahan C sampai halus kemudian masukan keadonan lalu aduk sampai rata.
4. Tuang keloyang lalu kukus kurang lebih 20 menit.
Nah, ini resep yang sudah kugubah (ta'elaaa, ky lagu!):
Creamcheese Cake
Bahan A :
3 butir telur
1/2 cup gula (boleh dikurangi lagi kalau dirasa kemanisan)
Bahan B :
1/2 cup tepung terigu
2 sdm tepung Maizena
1/2 sdt garam
Bahan C :
250gr cream cheese
50gr (atau 3,5 sdm)mentega tawar
Cara Membuat :
1. Panaskan oven 170C. Lapisi dasar loyang 20x20cm dengan kertas roti dan mentega.
2. Kocok bahan A sampai mengembang.
3. Masukan bahan B lalu aduk sampai rata.
4. Kocok bahan C sampai halus kemudian masukan keadonan lalu aduk sampai rata.
5. Tuang keloyang lalu panggang dengan cara au ban marie kurang lebih 30 menit.
6. Diamkan hingga hilang panasnya, keluarkan dan potong-potong. Hidangkan.

Nah, sekarang kalau dilihat posting-posting sebelumnya, mungkin ada yang berpikir, "Lhaaa kuenya kok polos-polos amat?". Iya memang. Tapi sadarilah bahwa dengan polosnya kue-kue yang sudah kubuat, kita sudah punya 3 rasa kue yang berbeda; coklat, pandan dan keju. Dari kue-kue yang sangat dasar ini bisa jadi acuan untuk berkreasi lebih lanjut kan? Sebetulnya sudah ada rancangan kue yang lebih meriah di kepala. Tapi kapaaaaaaaaaaannnnnn mau buatnya?? Menunggu alasan untuk membuat kue meriah. Uhu...
Wednesday, December 30, 2009
Pandan Sponge Cake

First of all, sorry for the quality of the photos posted (yeah right, as if my other pictures have good quality :p ). The weather is cloudy all day on the day the cake was made. So anyway I have to take picture anyway with my amateur photography skill.
Anyway, our home has pandan and suji on it's yard. I don't exactly remember how it started, but suddenly I wanted to try to make pandan sponge cake, without emulsifier. I know a lot of people now hardly making cake (or even traditional snacks) with real pandan and suji's leaves. Most of people, especially comercial baker choosed to use synthetic pandan paste instead. It is more practical, of course.
It is reasonable perhaps, when I remember my grandma made quite an effort when she needed pandan aroma. She actually had this mortar and pestle made from heavy iron to mashed the pandan and suji leaves to get the color and aroma she wished for. After that, she had to strain and squeeze it to get clean the green liquid. It is taking quite lots of time.
However, I stubbornly browsed for the cake with real pandan leaf and found littleteochow blog. In her pandan spongecake recipe, she just threw a bundle of pandan leaves in food processor, added a little water and blitzed it up, and strain it. Oo.. Aa..that easy.
So I thought I just have to give a shot. Of course in Indonesia we always pair pandan and suji for natural coloring.
but, oh, but, i think i have made some mistake. First, the recipe is really really for small portion. So when I used the 20x20cm pan, the pan was still too big. Find smaller pan, or double, or even tripled the recipe. Second, I follow the recipe too much. It suggested 40 minutes of baking time. You might want to try 30 minutes and see how it goes. The result my cake is a bit too dry. The aroma though, was still great. I am satisfied to make pandan cake with natural coloring. Ow..yay!
Here's the recipe. Don't follow my mistake.
Pandan Sponge Cake
Ingredients:
3 eggs
140g flour
80g caster sugar
1 tbsp condensed milk
1/3 cup melted butter
1/4 cup coconut milk
3 fresh pandan leaves
5 fresh suji leaves
Directions:
- Make knots of pandan leaves and suji leaves and throw into the food processor together along with coconut milk, then blitzed till the leaves became pulpy. After that, pour the leaves juice through a strainer.
- Combine the juice mix with melted butter. Stir well and leave aside.
- In a mixing bowl, beat 3 eggs, condensed milk and sugar until creamy, pale and stiff.
- Fold in the flour in 3 parts, alternating with the juice mix. Start and end with flour. Do not overmix.
- Pour into a pan that has been well greased and floured.
- Bake in a preheated oven at 170 degrees celsius for (try) 30 minutes or until a skewer comes out clean. Tent with a foil if top browns too quickly. Allow cake to cool before cutting

Tuesday, December 22, 2009
Cake Kukus Lapis Cokelat (a.k.a Brownies Kukus Lapis Coklat)

Sooooo..
Akhirnya Jumat lalu ikut juga kursus Cake Dasar bareng NCC. Aku kursus bareng Sari, temanku. Gurunya waktu itu bu Gemi Miranti dan mbak Ina.
Kemarin, setelah ragu-ragu (karena antara malas dan penasaran) akhirnya bikin juga Brownies Kukus. Aku bikin 1/3 resep, soalnya selain mixer-nya nggak bakal kuat (mixer-nya weis sepuh jeh) mengaduk 12 telur, aku juga takuuut kalau bikin kue banyak-banyak telurnya. Takut kalau gagal nangis deh, melihat telur begitu banyak tersia-sia, hehe.
Karena niatnya pas bikin setengah-setengah, aku sudah rada pesimis bakal jadi. Sudah begitu, ternyata spatulaku sangat tidak layak pakai. Spatula karet itu entah kenapa, pas dipegang rontok-tok-tok! Cari-cari akal..akhirnya melirik sodet plastik untuk wajan anti lengket yang baru kubeli. Yo weis, coba aja deh.
Pas lagi mengaduk telur, kok ya jambulnya petruk nggak kelihatan juga. Kan, katanya mengocok telur harus sampai ada jambul petruk, alias kalau adonannya diangkat dengan spatula terlihat 'mancung' dan nggak terlalu cepat jatuh lagi. Ini yang ada jadi inget hidung Squid Wood pas lagi meleleh. Tapi jambul adonan lebih lancip sih, hehe.
Kayaknya sudah lamaaa banget ngocok, sampai keringetan (tenang, nggak ada keringat yang jatuh ke adonan kok!). Aku masih nggak yakin kalau 'jambul' ideal sudah aku dapatkan. Tapi, daripada kempes lagi, akhirnya kumasukkan juga terigu dan teman-temannya. Pas mau memasukkan terigu ternyata si sodet kegedean dan nggak cukup lentur. Alhasil aku langsung ambil centongnya penanak nasi listrik. Bisa, sih. Tapi agak susah mengangkat bagian bawah adonan. Mungkin itu sebabnya rombongan cuppie yang belakangan agak-agak basah bawahnya karena coklat cairnya yang agak mengendap di dasar mangkuk pengolah.
By the way, kalau dipikir-pikir aku bikin kue alatnya pada darurat dan mengasihankan amat ya? Hehehe. Tapi aku jadi inget bu guru bilang, apapun yang terjadi, usahakan kuenya tetap jadi. Kalau aku mau mengubah sedikit deh, 'apapun yang terjadi harus jadi makanan' aja. Lebih fleksibel kali ya? Haha!
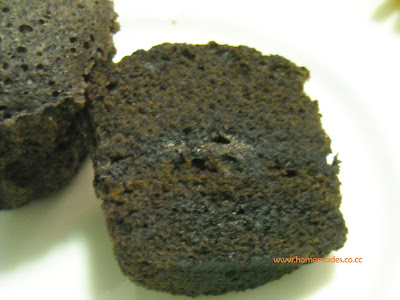
Annnnnyway, alhamdulillah, ternyata pas keluar hasilnya saangat memuaskan. Cuppie-nya so spongy, mentul-mentul, cukup ringan dan menggemaskan kaya pipinya Dedek. Kok nggak kaya pipi Abang juga? Soalnya kalau pipi Abang lebih cocok dianalogikan sama butter cake 8 telur kayanya, alias lebih padat dan legit, wakakaka! Kalau pipi Dedek kan memang empuk-empuk-lembut mirip sponge cake. Ini dia si pipi sponge cake. Lho, sponge cake kok makan sponge cake? :D
Sebetulnya aku rasa cake ini nggak akurat bila dinamakan brownies, seperti juga dengan brownies kukus Amanda. Yang mereka namakan brownies kukus yang lagi 'in' beberapa tahun belakangan sebetulnya beda konsep sama brownies sesungguhnya. Brownies kan, kue bantat, tanpa pengocokan sempurna demi pengembangan adonan. Sedangkan si brownies kukus justru dikocok sampai mengembang dengan cara yang sama dengan membuat sponge cake. Jadi, jangan ada yang marah ya, kalau kuganti namanya jadi Cake Kukus Lapis Coklat.
Ohya, satu lagi, aku senang banget karena berhasil mengganti emulsifier(TBM, Ovalet, dll) dengan susu kental manis. Pada dasarnya aku nggak begitu suka menggunakan zat aditif pada makanan. Mereka kan, bahan kimiawi juga nggak, sih? Aku yakin kok, jaman dulu orang bisa membuat kue tanpa zat-zat aditif tersebut. So, kenapa sekarang nggak bisa? Kan, kue bukan cuma soal penampilan, yang penting rasa. Memang sih, susu kental manis juga bukan bahan yang 'totally additive-free'. Tapi kurasa masih lebih baik daripada menggunakan emulsifier yang dari segi bentuk saja sudah nggak terlihat seperti makanan, hehe. Katanya sih, emulsifier juga bisa digantikan dengan kuning telur. Suatu hari aku mungkin akan mencoba menggunakan kuning telur tambahan saja. Atau bahkan sebetulnya asal tekniknya tepat kita memang nggak membutuhkan emulsifier tambahan? Hmm...
Anyway, aku yakin resep Brownies Kukus Lapis Coklat punya NCC sudah banyak beredar di internet. Jadi, di sini aku posting saja resep yang aku modifikasi(sedikit) beserta nama barunya, hehe. Aslinya sih, dibuat di loyang 26x26. Tapi karena aku buat hanya 1/3 resep, jadi aku buat di cuppies saja. Silakan mencoba.
Cake Kukus Lapis Coklat
Bahan A:
4 butir telur
150 gram gula pasir
1 sdm susu kental manis
Secubit garam
Bahan B:
1 sdm(munjung) coklat bubuk
100 gram tepung terigu
Bahan C:
100 gram mentega/margarin
65 gram dark cooking chocolate
Filling:
Coklat meises sesuai selera
Cara membuat:
Siapkan mangkuk cupcake aluminium(atau bahan lain) yang sudah dialasi mangkuk kertas
Lelehkan bahan C. Sisihkan
Panaskan kukusan dengan api besar.
Kocok bahan A sampai kental dan mengembang penuh, masukkan bahan B sambil diayak. Aduk dengan teknik aduk balik.
Masukkan bahan C, aduk balik hingga rata benar.
Tuang ke mangkuk-mangkuk kertas hingga 1/3 sampai 1/2 tinggi mangkuk. Kukus kira-kira 10 menit.
Buka kukusan, taburi coklat meises. Lalu tutup lagi dengan adonan. Kukus sekitar 10 menit lagi atau hingga matang, atau lulus tes tusuk.
Untuk sekitar 16 buah
Pelajaran yang penting pada pembuatan kue kemarin adalah; jangan menyerah pada minimnya peralatan, serta, jangan lebih besar modal daripada usaha! Nggak usah menunggu sampai punya mixer bagus atau oven mahal untuk mencoba memasak atau membuat kue. Toh, kalau sudah punya peralatan bagus pun belum tentu jadi bikin kue kalau semangatnya tetap nggak ada. Jadi, semangat!! ^__^V
Herewith, I declare that I have succeed to make my first sponge cake. Yahoooo!

Subscribe to:
Posts (Atom)